Introduction
This is an extension of the tutorial A login template for App Inventor published some months ago. The goal of this new version is to incorporate some wonderful ideas I’ve received since then:
- A more professional look for buttons (Erikv)
- Change resizing algorythm (Erikv)
- Direct login (Erikv)
- Fusiontable storage (Richard Lafleur)
- Multilingual (my own suggestion)
- Hyperlink from the help screen (also mine)
- Migration to Python 2.7 (Alvin , Orlando… and Google!)
Thanks for your ideas. Please keep commenting and I’ll do my best to enhance the template based on everybody’s contribution.
About this tutorial
The explanations in this post are not as extensive as they were in first part. We’ll see the goal of each new functionality and how it’s been solved, but without diving into technical details except to remark any tricky aspects.
Installation
The sources for App Inventor can be downloaded here. As usual it’s enough to upload the zip file into App Inventor and the app should work directly except for the following limitations:
- The database is stored in the default appinventor.appspot.com service which is not a good practice.
- The “Forgot password” screen won’t be able to send mails until you set up a service as explained in the tutorial How to send direct emails with App Inventor.
- The “Google login” will not work until you define the right values to the variables CLIENT_ID and CLIENT_SECRET as explained in the tutorial How to identify your user with OAuth from Pura Vida Apps.
In order to overcome the first two limitations, you can set up the AppEngine service available in the above mentioned tutorial How to send direct emails with App Inventor.
How it works
Buttons restyling
As ErikV says “default buttons in AI look childish”. The most immediate way to achieve a more professional effect is using icons. There are some good examples on the web, but I was worried about author rights and I’m not good at photoshop. Erikkv proposed this wonderful site but I was not able to produce icons that looked nice in AI buttons so I ended up with some home-made stuff. They’re definitely far from ideal but at least they enhance the previous version. If someone can contribute with a better option I’ll publish them in version 3!

Multilingual support
The template is currently available in English and French (sorry for my limitations in both languages). The user can choose the language clicking on the top-left flags and all texts are automatically changed:

The mechanism for supporting several languages is explained in the post A multilingual & multidevice template for AppInventor. To avoid confusion with the previous code, I’ve placed the new blocks in the lower part:

As explained in the above mentioned tutorial this code needn’t be modified except for the InitConstants function where you can adapt the texts for each concrete app. Just changing the two lists listItems and LST_DEFAULT_TEXTS you should be able to modify translations, add a new language, add new texts, etc.
Resizing algorithm
Erikv suggested changing the arrangements and size with the orientation, but without reshaping them. I’ve had a thought about it taking also into account my recent experience and I’ve decided it’s not realistic to define a standard behavior, because it will depend on each app, the kind of controls used, the number of devices we intend to support, etc.
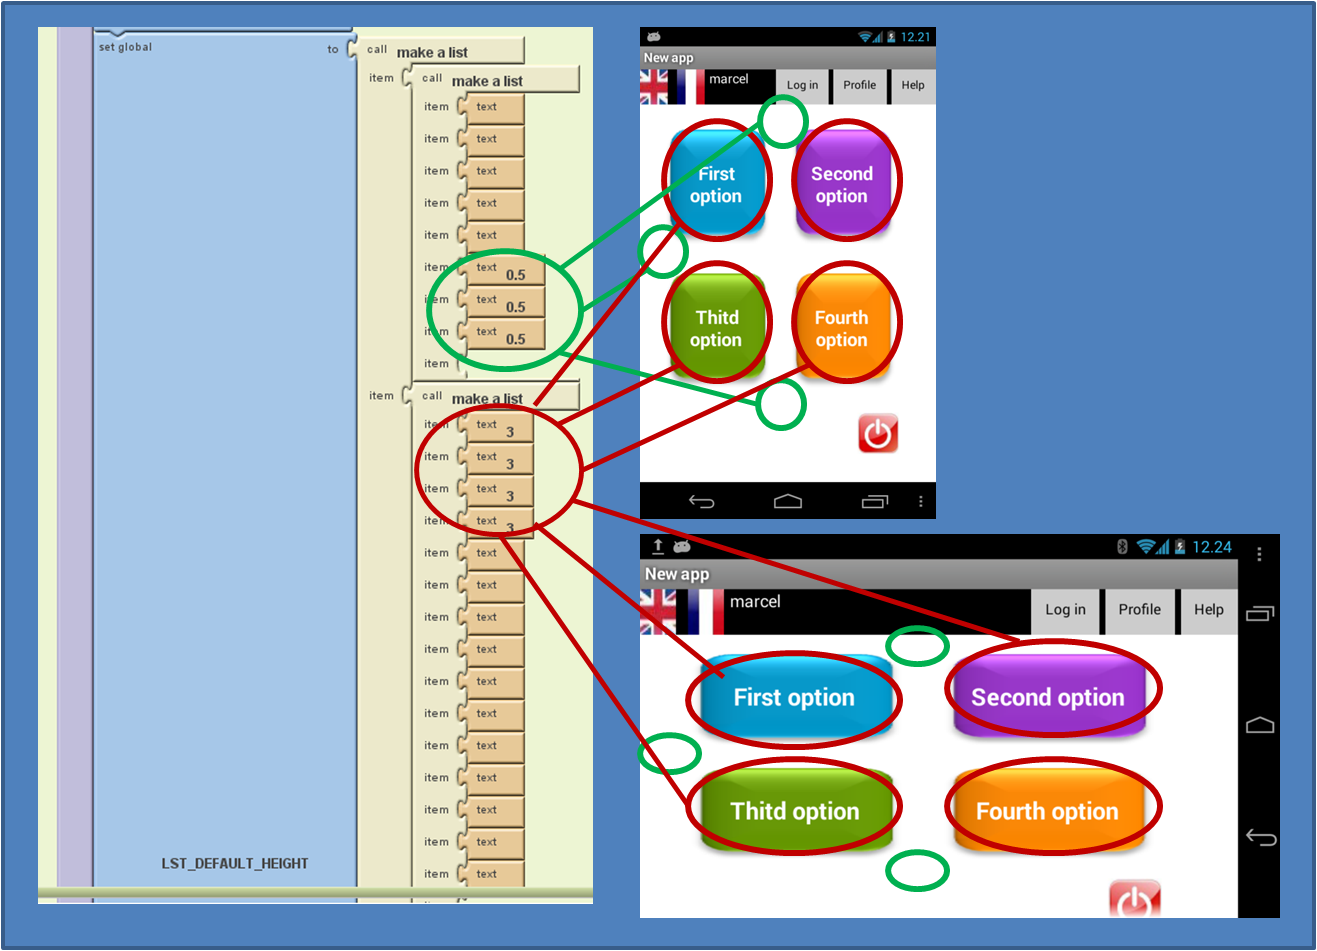
So the template is currently configurable as explained in the same post A multilingual & multidevice template for AppInventor. By default, the current behavior is the same as in the previous version, i.e. only height and size of menu options are resized according to screen size and orientation. However as I say this is easily configurable. For example, if we prefer the height to be fixed we just need to leave blank the 7 constants (4 buttons + 3 spacer labels) as shown in next picture:
Direct login
Erikv proposes enhancing the user experience by starting with the menu, and only prompt for a login when the user intends to use certain features. To do that, I’ve added some buttons on the top right bar, which change according to the current state: if the user is logged it’s possible to logout or change profile information, and otherwise there’s only the option of logging in:

The implementation of this behavior has consisted of some simple changes because the infrastructure was already set. It has mostly affected to the ShowScreen function which takes care of enabling or disabling the top bar buttons:

Fusiontable storage
TinyWebDb is simple to use from AppInventor but managing the data from the server is not very user-friendly. In our case, it would be useful to have a list of users that could be ordered, filtered by a given attribute, etc. This is typically achieved with datasheets, so Richard proposed to store users in a fusiontable. I considered two possible approaches for the implementation:
- Server side: Modify the service in order to redirect TinyWeDb calls to a fusiontable.
- Client side: Modify the code blocks in order to use a Fusiontable component rather than a TinyWebDb
I was initially inclined towards the second option because it looked smarter, but then I realized that modifying the client is an irreversible action involving some extra requirements for the template (creating a fusiontable, managing security…). From this point of view, the first option is more flexible because the same client app can work both with Fusiontables and TinyWebDb (it depends on which service you set up). So finally I’ve decided not to modify the AppInventor but rather to set up a service that redirects to a fusiontable any tag request starting by “usr:”. To install it you need to download this main.py and replace the one you have set up for the app. Then you’ll have to modify the SETTINGS section as explained in the comments and deploy the service from AppEngine.
This solution may appear somewhat artificial but it’s practical, and it has given me the idea for a future service that extends the approach of combining the ease of use of TinyWebDB with the server side possibilities of fusiontables. Anyway, if anyone is interested in modifying the client side, it’s just a matter of including a Fusiontables component and making the following changes to the code blocks:
- Fusiontable.DoQuery instead of TinyWebDB.GetValue
- Fustiontable.GotResult instead of TinyWebDB.GotValue (and a slight adaptation to parse the result)
- Fusiontable.DoQuery with an INSERT statement instead of TinyWebDB.StoreValue
Hyperlink from help
This is just a small enhancement I had in mind. The previous template provided the skeleton of the help screens with plain text. The new version includes a hyperlink in the last line that when pressed opens the web indicated in the text:
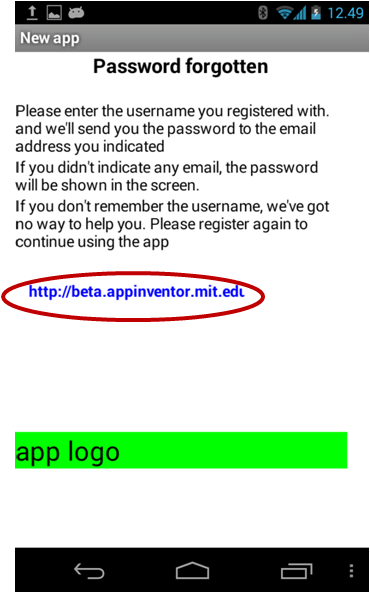
The solution is quite simple: the text is actually a transparent button and when clicked it calls the associated URL using a Web component.
Python 2.7 migration
This suggestion came both from Alvin and Orlando, but I should rather say it was actually imposed by Google when they announced Python 2.5 is not going to be supported anymore starting from January 2014. This affects only the mail sending functionality so I’ve simply updated the mail post and included the migrated sources. If you’re interested in the steps required for the migration you can have a look at the post Python 2.7 migration demystified.


Any chance I could ask you a few questions about migrating to 2.7… I am lost and you seem to have this stuff down to a tee!
I understand you may be quite busy but any help would be greatly appreciated.
Of course you can ask the questions. If you think ithey may be interesting for others publish a comment; otherwise send me an email
is the “Login template for App Inventor (version 2.0)” compatible with app inventor 2? and, If so, hot do I import? when I try to import, app inventor 2 asks for aia. but there is NO aia in downloaded folder.
Not yet. I’m waiting for MIT to publish the upgrading tool as promised. In the meantime it works only in AppInventor Classic
Thanks…since I can’t import it, can I BUILD it in app inventor 2? Sorry if this sound like a silly question. I’ve been using eclipse. But, I like the concepts app inventor offers. What I mean is; If you understand the logic needed to put together an app, you don’t have write hundreds of lines of java/xml code. it seem like a more efficient use of time.
Sure you can, but it looks like a hard work. I still hope MIT will release the upgrading tool some day, but if it takes too long maybe I’ll try it myself.
I agree with your comment about AppInventor. It has some limitations when facing complex projects, but for simple apps it’s definitely an option to take into account.
Very good write-up. I absolutely appreciate this site. Keep writing!
Hi Eixerits,
It is really spectacular work done!! Great help for people like me, who are having li’l bit knowledge of coding and trying to do some hands on app inventor.Today, Login facility is required in almost all apps. I have gone through most of your posts. I am trying to build login functionality(on same line to Modify the service in order to redirect TinyWeDb calls to a fusiontable.) I downloaded main.py from above post and I am stuck with below issues and queries…
1. “To install it you need to download this main.py and replace the one you have set up for the app. Then you’ll have to modify the SETTINGS section as explained in the comments and deploy the service from AppEngine.” – Where are settings section explained in comment? How to modify the same?
2. I have created customized TinyWebDb. Can I created several fusiontables supporting my app using above logic. If yes, what modification I need to do? else is there any other way. (Aim is to use SQL query to extract from various fusiontable)
Any help would be greatly Appreciated as this is my first app and in learning phase.
Keep up the good work..!!
Hello Avinash, here’s the answer to your questions:
1. The SETTINGS section are lines 11 to 19. You’ll see these lines contain a “#” which is the start for the comment, i.e. the text from that point on is a hint for the content expected in the line. For example your line 12 should look like this:
google_user = “avinashsaindane1985@gmail.com” #indicate here the gmail address for your app engine account
2. Yes, you can modify the code in order to access various fusiontables. Currently it accesses to the table indicated in the xtableid variable (which is informed in the settings section). So to access a different table, you have to modify all the lines that use this variable and change xtableid by the identifier of the right fusiontable
Sorry if it’s too short. Of you need more details you can send me an email